The Crowded Pot Myth: Why More Plants Do Not Always Mean More Green
Learn how spacing plants in a container creates a fuller, more legible display, with a simple weeklong plan for adjusting crowded or sparse pots.
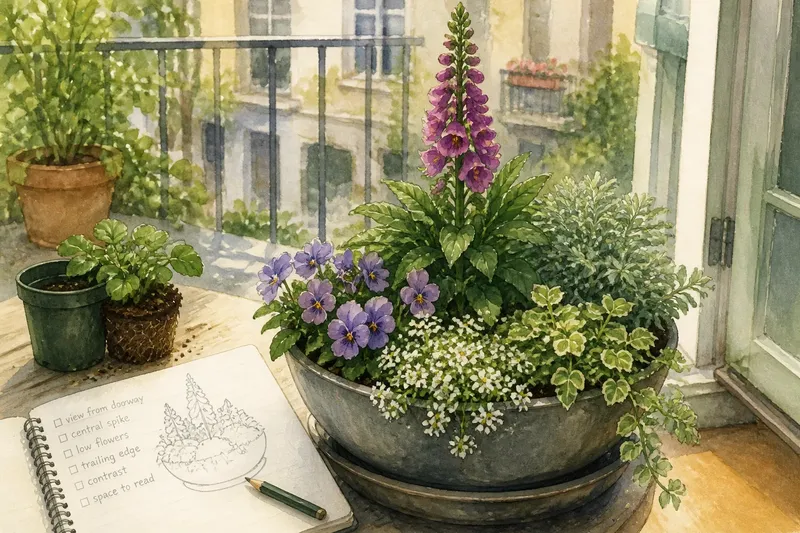
You set a tray of young plants beside a balcony pot and start filling every open patch. The arrangement looks lush from above, but its leaves soon overlap, the flower shapes blur, and the container reads as a tangle. Spacing plants in a container is not a choice between abundance and emptiness. It is a way to decide what the planting should look like as it grows.
A packed pot can work when the plants stay compact or the desired effect is a close carpet. But adding another plant does not automatically add visual fullness. The result depends on how leaves, stems, and flowers meet, and on whether the eye can still pick out the shapes you chose. A week of deliberate observation can help you edit the arrangement without turning it into a rigid formula.
Spacing plants in a container begins with the view
Before moving anything, look at the pot from the place where you usually see it: a chair, a kitchen window, or the doorway to a shared courtyard. A planting that looks balanced from directly above may hide its tallest stems from the side. On a balcony, the view from indoors may matter more than the view from the railing.
Notice the outline first. Can you distinguish an upright plant from a trailing one? Are individual flower clusters visible, or do they merge into a single mass? Look at the gaps between leaves as part of the composition. A small open space can make neighboring forms easier to read, just as a pause between objects on a shelf helps each stand out.
Write down one plain description of what you want to see: “a clear central spike with low flowers around it,” for instance, or “soft foliage spilling over one edge.” This gives you a reason to keep or remove a plant beyond simply filling bare soil.
Choose the view you care about most before you rearrange the pot.
Give each plant room to keep its shape
Plants occupy more than the space their nursery pots suggest. A young upright plant may widen as new stems appear; a trailing one may extend across neighboring foliage. Two plants pressed together can lose their distinct outlines before either looks especially large. The question is not only how many can fit, but whether each can make the shape that drew you to it.
Check the plant label for its expected habit and mature spread. Compare that information with the container and with the neighbors, rather than treating the current size as the final shape. If a label is missing, look at the plant itself: note whether it branches from the base, sends up a central stem, or reaches outward along the rim. These clues help you anticipate where its leaves will occupy space.
Keep contrast in mind. An upright plant beside a low, rounded one may remain legible even when their foliage touches. Several plants with the same height and leaf texture can read as one block, even if their stems are not physically crowded. Spacing is therefore partly about visual difference, not just distance.
Use the week to make a measured adjustment
Think of the routine as a sequence of observations rather than a single dramatic replanting. You can move a pot, turn it, or remove a plant from the arrangement without changing the whole planting at once.
- Day one: Look at the pot from its usual viewing position. Note which plant you want the eye to notice first and where the shapes become hard to separate.
- Day two: Identify each plant’s habit and likely spread from its label or visible growth pattern. Mark which one is meant to rise, fill the middle, or trail over the edge.
- Day three: Turn the container and check whether the same shapes remain visible from another common angle. If one plant disappears behind another, decide whether the display should favor one view or several.
- Day four: Move one plant or take one out temporarily, keeping its root ball intact. Set it beside the pot and compare the outline before deciding whether the gap improves the composition.
- Day five: Leave the revised arrangement in its normal place. Observe it at the time you usually pass by, when you are less likely to judge it only from above.
- Day six: Look for leaves or stems that now have room to show their individual form. If the opening looks stark, shift a neighboring plant slightly rather than adding another by reflex.
- Day seven: Keep the arrangement if its main shapes are easy to recognize. If not, make one further small change and give it time to settle before making another.
Say you have a balcony pot with one narrow, upright flowering plant and three low plants with similar rounded leaves. From the doorway, the low plants merge into a green mound and conceal the upright stem. Imagine moving one low plant to a separate container and shifting the remaining pair toward the rim; the expected visible result is a clearer central line and more distinct foliage, not simply an emptier pot.
When does a crowded planting help?
Can a container look full without many plants?
Yes. A plant with branching stems or broad foliage can occupy the view generously on its own. Repeating a small number of contrasting forms can also make a display look intentional without filling every patch of soil.
Should plants touch in a container?
Touching leaves are not automatically a problem, especially when the plants’ shapes remain easy to distinguish. If foliage becomes a continuous mass that hides flowers or stems you wanted to see, create more separation or adjust the arrangement.
How can I tell whether a gap is too large?
Look from the position where the pot is normally seen, not only from above. A gap may feel large at close range yet provide useful breathing room from across a balcony or room.
What if I want an intentionally dense display?
Choose plants whose habits suit a close grouping, and accept that some individual outlines will be less visible. Check labels for growth expectations, then arrange the plants so the overall texture is the intended feature.
Keep a visible focal point as growth changes
A pot is not a fixed picture. New leaves can close a gap, stems can lean toward light, and flowers can alter which part catches the eye. Revisit the arrangement after noticeable growth, but avoid changing it every time one leaf crosses another. The aim is a readable planting, not a frozen one.
For a container seen from several directions, rotate it occasionally and notice whether one side has become much denser. For a pot against a wall, arrange its most important shapes toward the open side. These small choices help the display make sense in the actual space rather than in an imagined view from directly above.
When deciding whether spacing plants in a container needs another adjustment, return to the sentence you wrote at the start. If the main shape is still clear, a little overlap may be part of the planting’s character. If the plants now obscure that shape, remove or reposition one before reaching for another to fill the soil.